PIN HOLE CAMERAS
What is a pinhole camera?
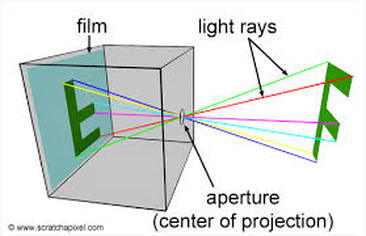
A pinhole camera is a camera without a lens but a tiny pinhole. Its a light proof camera with a tiny hole on the side. Light from the scene passes through the pin hole and projects an inverted image on the other side of the box. This is known as the camera obscura effect.
A pinhole camera is a camera without a lens but a tiny pinhole. Its a light proof camera with a tiny hole on the side. Light from the scene passes through the pin hole and projects an inverted image on the other side of the box. This is known as the camera obscura effect.
How do you make a pin hole cameras?
you will need;
a box (not to big but not to small)
photographic paper
black paint
a pin
thin metal
step 1. paint your box pitch black inside and out
step 2. cut a small square out of the box and metal
step 3. stick the pin through the metal to create a small hole
step 4. stick the metal on the hole you cut out the box (stick a piece of tape on the pin hole so no light can get through for now)
step 5. in a dark room place your photo paper on the other side of the pin hole and close the box
step 6. put the box where you want the photo to be taken
step 7. remove the tape and let the photo develop


My Pinhole Camera
in class, today I made my pinhole camera. I painted the inside of my tea box with black acrylic paint and waited till it dry. i cut a small square off metal a pushed a pin through the center. then i cut a square (which was smaller than the metal) and stuck the metal on the inside of the box where the hole is. next I taped the outside with black duct tape so no light could get in.
to create an image I put a piece of photographic paper (in the dark room) opposite to the pinhole. Next I made a flap to cover the hole using duct tape so the light could not get in. Then I went outside and chose where I wanted my image to be taken. Once I chose, depending on how bright it was, I removed the flap for 20 seconds and closed it. I took my photo back into the dark room and developed it (using developer, stop and fixer), then I dried it.
to create an image I put a piece of photographic paper (in the dark room) opposite to the pinhole. Next I made a flap to cover the hole using duct tape so the light could not get in. Then I went outside and chose where I wanted my image to be taken. Once I chose, depending on how bright it was, I removed the flap for 20 seconds and closed it. I took my photo back into the dark room and developed it (using developer, stop and fixer), then I dried it.


|
www:
my pinhole photo came out successful and shows a clear image. I really like how bold they are. |
ebi:
I could of angled my camera better so my photo came out straight. I also could of opened the flap for longer so its more developed. |
